Saturday 16 November 2013

EXP 2 FINAL SUBMISSION


The second experiment for BENV2423 was different and interesting as we were given a model and then we had to show it in what it could be like 100 years after human life, this was quiet different as it wasn't a easy experiment, i had some troubles with this but i worked through them to get what i had in mind.

When it came to decay the model i looked at the different types of materials and tried to understand how they work and how they will break off after the 100 years, like for concrete it will break off and crack over time because of the weather and moister in the air and glass will break in high wind areas. below is my submission for experiment 2.


this image shows how the glass is broken and the walls have decayed 


this is also another image of the walls and roof how the concrete has broken over time 


this image shows the floor slab and glass balustrade broken and decayed


in this image you can see the slab again broken and decayed off 

below are some of the textures i used as some textures didn't work i managed to get some to break.
it was very important to add the materials so you can get the best decay state.


The interactivity in the building was the decay i tried to use rayfire but it wouldn't show as i wanted it to show so i decayed it in max by modeling the decay my self in max.

The final part of this experiment was to create a trailer to show the decay in our model 100 years after human life and also to keep in mind the reference trailers we looked at in Week4.
below is my trailer of the final submission for EXP 2.


WEEK5 EXP 2


I will be demonstrating the nation of decay within my building by creating materials that i would apply to my building, depending on the material of the object like steel, concrete or even glass. I will also use other plugins that will help me decay the building to make it look in a bad state.

This weeks lecture by Jeremy Harkins was very interesting as i was Jeremy student in semester one, i enjoy learning and listing to Jeremy, just the was how we can use the what we learn in the real world is is very effective and i will be taking what i have studied and the technique i have learn to the real world my self.

to finish of it is very important to understand the programs being used in studio to be able to know how to express the idea you have in mind for your project even when you are not to familiar with the program that are being used.

WEEK4 EXP 2


For this week we were required to use the blend layer inside of cryengine, and apply the technique in our building. below is a 3 images of the blend layer in cryengine.


then the next part for this week we were required to find 5 different trailers to use as a reference and get an idea on how to create a trailer for our final experiment. below are the 5 trailers i found.


Monday 28 October 2013

WEEK 3 EXP 2


for this wee we had to sketch our chosen house and make it look decade and how it could be after human life through natural change.

below are the 3 sketches of the Rudin house 


 i then keeped working on my model of the Rudin house that we were given and retraced it over to have a single model and a four sided walls to make it look 100 years after human life.

this weeks lecture was different as it allowed us to understand how buildings can decade and fall over with out human life on earth it was also helpful in understanding how the materials will react different over the 100 years after human and how we can show this using 3Ds max.

WEEK 2 EXP 2


for this task we were required to use Photoshop to apply textures to our building using spec maps. below are screen shops of a textured i used to do this.


Then we were required to research 3 materials and find out how each martial is made and the life span of each one and what conditions will decade the materials pros and cons and the use of each material, my 3 materials are Steel, glass and concrete.

STEEL:

steel is made from iron with carbon being the primary alloying element, the life span of steel is all depending on the conditions and the steel, the conditions that will decade steel are wind and salt water as steel will rust and break up over a time. steel is a strong material and its pros will be that it is strong with tension nut its weak when it comes to compression.

GLASS:

glass is made from melted sand, lime and sodium as they get all melted together to form a hard clear material, glass doesn't really have a life span it all depending of how it is used and treated in its life,the conditions that will decade glass will be wind and areas where the weather is consent change, the pros and cons of glass is that it is a very sensitive material and if it not used right its very weak that is why glass needs rubber seals to hold it in place.

CONCRETE:

concrete is made from cement sand and water they mix the three together depending on how strong the concrete should be, concrete hardens over time the average time span of concrete is about 30-40 years in a high condition change areas, concrete can decade by weather change water movement damaged that is done physically and by weight, the pros and cons of concrete, concrete can hold a lot of pressure and its very good with compression but doesn't hold as good when under tension


this weeks lecture was quiet interesting to see examples of how different materials are and how each material will be affected under different conditions its helped me understand how materials work and how they can decade and break and to see how the materials look like once they are damaged.


WEEK 1 EXP2


for the first part of this week task we had to get the plugins to export from 3Ds max to cryengine after we did we had to model up a part of the house we would like to do for this experiment and follow the tutorial below are two screen shots of what i exported to cryengine.


the next part was to get 3 images of the houses and write about them the buildings are, Barcelona pavilion, house in Bordeaux and the Rudin house


The Barcelona pavilion is a very modern design made from steel, concrete and glass this one design is outstanding with the long roof spans and glass walls with the water giving the design a modern feel 


The house in Bordeaux is one creative design as it is a 3 story house with open spaces, the main concept of the house is the lift in the middle that acts as a floor to move around in the levels, the matrials that have been used are steel, concrete and glass.


The Rudin house is a very box looking house but yet a simple and smart design. the house from different angels will seem like it is floating but yet held up by concrete columns and the stairs. this is a concrete structure and with a very high pitch roof its a simple but appealing design. 


This weeks lecture was very productive as to see and learn how life after people could be like and also how different materials will break and decade after human life, it helped me understand how materials can be used and broken over time and how much they can hold after they start to to break. i will be using what i learnt with this final experiment.

Sunday 15 September 2013

EXP 1 SUBMISSION

As part of this experiment we had to develop an island that is significant to us, this was a challenge to see how creative i can be, we also had to conceal a letter and number in the island my number and letter are 'Y4" this is what we had to look for in the island and keep it creative and unique to the user and myself. below is the final submission of this experiment

strategy statement was to help me understand how i was to conceal my letter and number starting from macro to mirco scale within my island, click here to see.

5 draft images of my island can be found here and here  

video trailer 
we had to also create a trailer to promote our island and let the user see what to expect in the island, this was a challenge as it haven't had many experience with making a trailer. i added sound to the trailer for more suspense and a dark feel to my island as its a lost island in the unknown. below is my movie trailer.


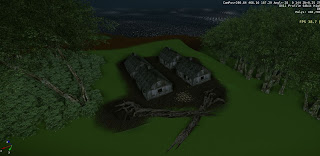
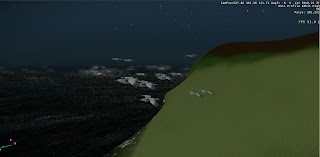
below are some screen shots of my developed island.


file for my cryengine island can be found here.


Thursday 12 September 2013

WEEK6

This week was to review our other students work and post a review of that on our blog below are the screenshots.

this was just a way to motivate me and the student to do better in the environment and help them in improving later on.

DRAFT SUBMISSION

As part of this week task we are required to submit a draft submission of our experiment.

The experiment brief was to create an island that is to conceal a letter and a number in this case my letter and number are 'Y4', we have to stay creative and keep our letter and number seen in ways that is pleasing to the user, the letter and number have to be 5 various scale from macro to micro, i have tried different ways and effects to show my number and letter and i did my best to conceal this as i will improve it more. below are the images from my cryengine. 


This image here is a birds eye view of my island my letter and number is the shape of my island with the 'Y' in the middle and '4' arms around it. This is my macro scale.

My second image is of fallen trees to combine the letter 'Y' and the '4' houses around it to form my number, as for the fallen trees you will see the 'Y' in different places as you walk around the island i am  trying to do this as i want to conceal it in a creative way.

The third image is of a broken down beach hut and a old water tank my letter 'Y' is concealed with the beach rocks and the '4' lamps to show my number.  


My forth images are of '4' turtles and birds for my letter 'Y'. the birds as you can see in my first image is that they are all moved around and only when you look at it from a top view and ground view looking up you will see the letter 'Y'.

My final image is my micro image of my letter and number this is shown in the terrain of my island hidden away, the 'Y' is in the middle and the '4' are the dots in the land around the letter.


The final step in the experiment is to keep adding detail to my island as i will be doing over the week and i will also be developing a trailer for my island as for my last submission. This week lecture overall was useful in planing my submission and helping me understand the stages needed to finalize my final submission. 

Wednesday 11 September 2013

WEEK 4

the first step for this week task was to find an painting or image from one of the people we had seen in the class i have chosen joseph mallord william turner. below is the image


the next step was to create the same feel of sky in out cryengine terrain below are the brfor and after images.


before


after

screen shot of my time of day below.


This week lecture was quiet interesting as we had to find out ways to change the sky and how it could affect our island its a good way as it helped me understand the program more and give my island a different appearance. 

WEEK 3


today task was to find 4 reference images of works by one of the landscape architects giving to us in the lecture. once we had selected our images we then had to create a area throughout our island in cryengine related to those images that we found. below are the images and my images in cryengine. 


( claude lorrain )

( capability brown )

( capability brown )

( william gilpin )


the nxt part was to find a 5th reference image and show a area in our landscape related to that image we have found, i have found an image of a forest with the trees shown above, below are the images of the forest and my own environment.

 my cryengine


next part was to create a short clip of our cryengine blow is the clip


this week task has helped my understand why its important to have a good landscape, this has helped me with my progress with my cryengine and helped me using the program and a much better understanding in this assessment.